Wednesday, November 22, 2017

Using Google Forms and Google Classroom to Organize Group Work

This year, I started teaching computers. We also JUST got Google Classroom so I am having to navigate a totally new type of teaching and curriculum, and I am actually having so much fun exploring the different possibilities. One of the things I have been playing with is using Google Classroom to do group projects (with different jobs!)

Our sixth-grade curriculum has a group project for Public Service Announcements as multimedia assignments. The assignment is designed for a group of four, with each student having their job with different components that they are responsible for keeping track of and turning in. 

Overall, it's not a bad project. The biggest problem I found was that the way it was written and planned, was like 90% an on paper project... IN COMPUTER CLASS! This would not do for me. Am I not a computer teacher? Shouldn't I be finding ways to teach my students how to use technology to plan, collaborate, and publish? I immediately started to adapt the project to work for me.

Assigning Jobs

The first paper form that I was supposed to give the groups was where they assigned jobs for each member of the group. I immediately thought a google form would be the best way to accomplish this (For other great uses for forms read my post about the many uses of Google Forms).

It honestly took about 5 minutes for me to turn this page into a google form. I had a place for them to enter their names, select their teacher from a drop down, and select their topic. I then had job descriptions for each job with a place to assign a member to each job.


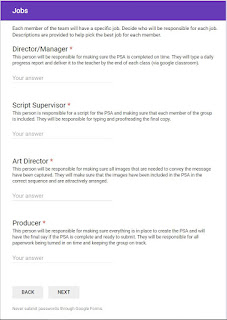
Here is the form I used for my sixth graders. As you can see, extremely simple and did not take very long for the students to complete (NOTE: Only one form should be filled out per group!)

I sent the link to them via Google classroom in an announcement.


What Now?

Now that you have jobs for everyone, it's time to start assigning work!

After I received the forms for one class, I went to the response section of my form editor and used the spreadsheet button to view them all in a Google Sheet.

I then had each group and their job assignments in a nice sheet. 

NOTE TO TEACHERS WITH MULTIPLE CLASSES: If you would like a separate sheet for each class, all you have to do is use the "Unlink Form" option in the response menu (the three dots). Then delete all responses so you are ready to collect data for the next class. When the next class fills out the form, it will not put the data on your previous sheet. You can click the spreadsheet button and it will make a whole new sheet with all the responses that you have (which is why I delete each class's responses after I have moved them to a spreadsheet).

Assigning Jobs

We used Google classroom earlier to send the form. Now I have to send the appropriate materials based on the different jobs. With this project I knew I wanted each student to be responsible for something that needed to be turned in. I sent these as assignments so they had a place to submit it. To make it very clear what each student was responsible for, I only sent the different assignments/materials to the person with that responsibility.
This is very easy to do! When you create an assignment, you can decide if more than one class will receive it or if only specific students in a given class will receive it (also great for differentiated assignments!). I used my spreadsheet and was able to know who all of the directors, script supervisors, etc. were.

Sharing files

As an added way to teach students about collaboration, I had each of the students SHARE (Google is great for this!) their documents to their group mates. This way every one has access even if their is only one person turning it in at the end of the project. The kids really liked being able to all add to their research page at the same time using their different resources. This is also really nice when a student is absent, it doesn't mean that the students don't have access to something.


There you go!

I realize that this is a pretty "quick and dirty" how to, but I hope it gives you an idea of how forms and Google classroom can be used together to get students engaged and using 21st century skills for group projects.

Friday, November 17, 2017

Paperless Vocabulary Practice


Let's talk about Vocabulary practice. When I first started teaching my team had some wonderful vocabulary foldables that they found on Teachers Pay Teachers. It is a great foldable and if you're interested you can still download it for free from Teaching with Motherbird.
Alright, Paper-Haters,

Vocabulary Foldable for ALL Subjects!
Product by Teaching with Motherbird
These foldables caused so much stress for me, not because they are bad because they aren't! They are actually great. They just ended up all over my room. Students did not keep track of them; it took them forever to finish.  BUUUTTTT... I really liked the concept of the students writing the word, writing the definition, using it in a sentence, and creating a visual reminder

After a couple of years, when I started to find myself as a teacher and started to be more confident to do things differently than my colleagues, I started to realize that digital was the way to go for me.

There are two ways that I love to do vocabulary. One of them is free if your school has Google Classroom (GOOGLE!) or Edmodo (or a similar platform). The other does cost money but was so worth it to me, which was Pixton! Today we'll talk about Google Slides (or Powerpoint).

Google Slides

"Slides" is one of the apps of the G Suite that, if you are not familiar with, closely resembles our beloved Powerpoint. The reason I like using Slides or Powerpoint for these kinds of assignments is it is easy for the students to click where they are supposed to type and just start typing. They do not have to do any formatting and they are less likely to mess up the layout that you have for them. I will be talking about Google Slides, but understand that you can do this similarly with Powerpoint.

Pre-creating the Assignment

In most of my teaching career, I have had students that need a LOT of scaffolding with assignments. I cannot just give instructions that they should have each vocabulary word, with a definition, sentence, and picture. It ends up just a mess. It is important to have the assignment sort of "pre-made" so the students just have to fill in the pieces. If your objective is vocabulary practice, then that is where the focus should be. If the students have too much tech figuring out to do, then it is no longer a vocabulary assignment; now it's a computer assignment.

I found that having blank text boxes for each field that the student needs to complete helps the students because they can just click and start typing. (TIP: If you are labeling what should go into each box, make these a separate text box so that the boxes that will be used by the students still just click and go.) See a super simple, no-frills example of what one of my slides might look like:


Like this and don't want to start from scratch?

Get your FREE copy here with the template already made into a master slide so that you can add as many as you need!

This link will prompt you to make a copy in your Google drive.

When creating your template:

  1. Be sure to have labels separate from the boxes they will type in (as said above).
  2. SPECIFY that students should not just do a google search using the vocabulary word to find a picture... They need to be CREATING A PICTURE. This is the one part that you will probably need to have your students know the tools a bit. I have seen kids create AMAZING visual representations just using the shapes and lines tools.
  3. Before sending the template out to the students, make sure you have the number of slides ready that they will need (if it's five words a week, there should be five slides that have the template ready to go).
  4. If you know how, I would make the template a Master Slide so that if ever the students have to add a new slide, they can click the + (add slide) button and have the same template ready to go (not having to mess with copying and pasting slides...) 

Want more stuff like this freebie? Don't forget to follow me on my Teachers Pay Teachers Store for more like this! 

Paperless Solutions, Animated GIFs, Data Spreadsheets, and more!


Wednesday, November 15, 2017

How to Use Animated Banners for Google Classroom

I have been debating what I wanted my first post to be about and finally landed on Google Classroom Themes/Banners. Thank you if you are reading this, as this blog is definitely a work in progress, but I want to help other teachers learn some of the things that made technology work for me as a teacher.

Google Customization

When I first started using Google Classroom, I wasn't really focused on customization yet and making it pretty. I was more focused on learning how to make it work for my classroom.

The truth is, making your Classroom look special does not take much effort! You have probably figured out how to change the "theme" of your classroom by clicking the "select theme" button on the picture:
THIS BUTTON HERE!

Google has some very nice looking images, but for some, they are too generic and you want something that is more "you." For those people, there is a great "upload image" option. The problem I always had was finding the right size image, which needs to be 800 pixels by 200 pixels. I started creating images to fit my needs.

Animated Themes

As I was searching for premade themes I saw that some people were using GIFs as their image for their classroom theme to have animated themes! Of course, I jumped on it...

Using a GIF is JUST AS EASY as using a regular image. You simply upload the file the way you would any other image. See?


You can create your own GIFs to use, or find them online. If you like the banner I used in the demo, you can get it here in my store for free! Don't forget to look at some of the other themes/banners I have created too!

Sunday, April 3, 2016

Introductions

Welcome to my paper-hating blog! 

This blog is where I am going to document some of the great tools I find to use in the classroom as well as to help stay organized professionally and personally.


On my page titled "About Mrs. Khatthaname" I go into why I've created this blog but simply put, I hate paper. I don't like organizing it, storing it, making copies (and as a teacher that is a lot of copies!), having to recycle or throw away those copies that you spent so much time on... I just hate it.

Hate is a strong word... but YEP, HATE it.


In my classroom, my students learn to do quite a bit on the computer. We are a one-to-one device school which means each of the students has a device for school. In our building, those devices are Lenovo Laptops. As soon as I got my cart I was all over it! My students were using Edmodo, publishing their writing as word documents, learning to format, uploading assignments... As many skills that I could possibly teach them that I thought would be beneficial in the workplace, I went for it. It also made my job so much easier! Instead of making a ton of copies of that quiz I just created then have to go through and grade, I published it on Edmodo and my job was done. Questions that are multiple choice, fill in the blank, or matching get graded for me. All I had to do was look through the written responses. It was on my computer and online which is always with me so I could do this whenever it was convenient (without carrying stacks of paper everywhere I go).

That was not the case with many teachers. They used it for Imagine Learning. And that was about it... Imagine Learning is a great program that helps kids with language skills that our district seems to really love, but let's call it what it is... a video game. It teaches absolutely no computer skills as it is a click, click, click program. No typing is involved, no navigation skills, no problem solving, no tech skills whatsoever.

Well, my goal for my school is to help spread some tech knowledge to other teachers. Not every class will end up a "paperless" class, nor will all teachers even want that, but my hope is that I can help my colleagues by showing ways to make things simpler using technology and encourage them to instill computer skills in their little humans. They are going to need them when they go to college and/or the workforce.

I hope that my blog is helpful for someone out there. If not then I will use it to practice my writing skills :P.